I was true to my word. The photos just came in. . .
 |
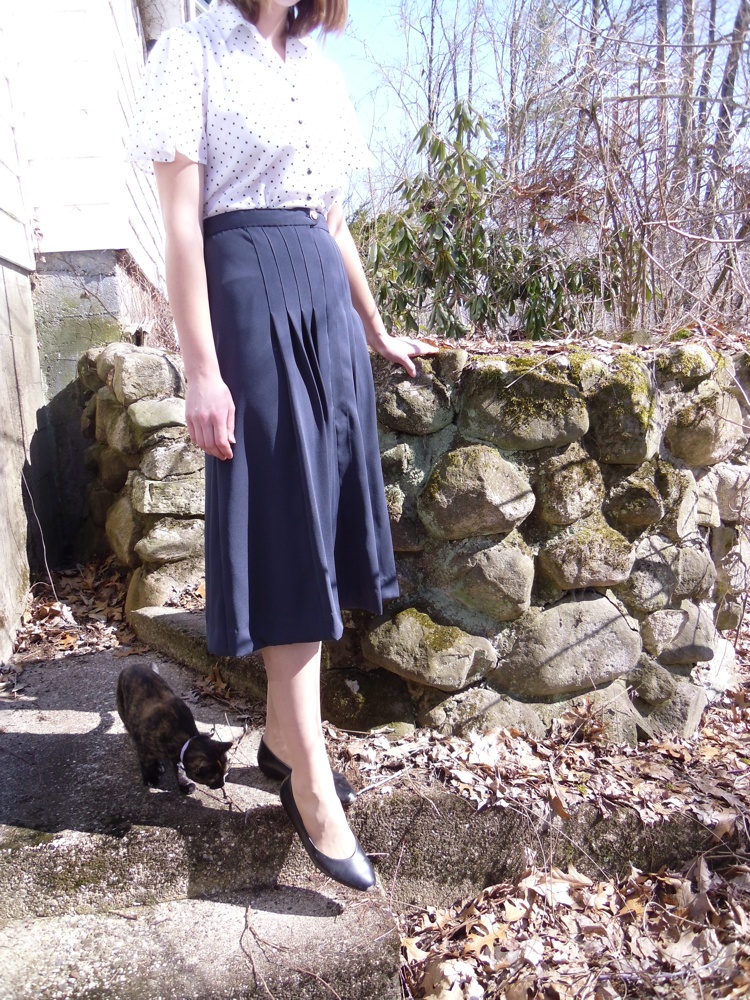
| [ By the way, I'm not wearing the shoulder pads in these photos. I discovered that the weight of the skirt solved the shoulder issues! ] |
Catherine and I just took these photos this morning. When I was sewing up this dress I was worried that I would need to take photos with a snow covered background. Thankfully, some warmer temps have arrived!
Now onto the details!
The Features of this Dress: Topstitched, knife pleats in the skirt, pleated sleeves, shirt dress type bodice, and an inset belt at the waist.
The Fabric: A light to medium weight rayon crepe in a navy blue color, was used for the skirt. A cotton lawn with printed polka dots was used for the bodice. The crepe was bought from denverfabrics.com three years ago and the cotton lawn was given to me by a neighbor.
The Pattern: Simplicity 2106 from 1949 was used.
This vintage pattern was bought three years ago on Etsy. Envelope is tattered for sure but the pattern pieces are in great shape. Also came in my size which was a real bonus! I tweaked the style a bit by removing the button band closure on the skirt. I opted for an invisible zipper instead. Not many alterations had to be made for this one. I only needed to add 1" to the waist and 7" to the skirt's length. OK, that second number is large but it was an easy one to make!
The Construction Process: Let me first talk about the underlining. As I said in my previous posts, the cotton lawn I used for the dress's bodice is much too transparent to wear on its own. That's why I decided to use an underlining for the bodice area and omit it from the sleeves. A medium weight cotton in white was used. So what is underlining? Underlining is a second layer of fabric that is basted to the fashion fabric, (the main fabric that is seen from the public side), which is then sewn in unison. The public layer and the underlining are treated as one layer throughout the sewing process. You can see the underlining in action in this photo:
 |
| [ Picture of the inside of the dress. You can see the white cotton that was used for the underlining ] |
So what type of hems did I use this time? For the hem of the skirt I used my traditional method: serging the raw edge, turning up the hem, and slip stitching in place. I used a 2" hem this time.
For the sleeve I used a narrow hem. It was the best choice for such delicate fabric.
As I said up above, I replaced the buttons that ran down the front of the skirt with an invisible zipper.
The zipper stops at the inset belt; right near the belt's button.
The inset belt was a tricky little devil to sew in. The pattern instructions told me to topstitch the belt entirely. I gave it my best shot but the layers kept on twisting on me so I wound up slip stitching a part of it. It looks great so it was worth the extra effort. I also want to point out here that I sewed both seams with twill tape and I used sew-in interfacing for stabilization.
 |
| [ An interior shot of the inset belt ] |
Two of my favorite aspects of this dress are the buttons. . .
And the pleats with their topstitching.
So there you have it. I'm so happy to have joined this sew-along and actually saw it through. I've joined
a sew-along before and never even made it past the muslin! Now you see why! I cannot wait to see everyone's 40s creations on parade. Thanks, Rochelle, for being such a dynamic hostess and making this sew-along both motivating, inspirational, and fun. I think everyone has been victorious!
See the other posts that are part of this series by clicking here.Labels: sew for victory, sewing