Every sewing project I choose to do I ask myself at the very beginning: "What can I add to make it special?" A lot of the time I choose a different hemming or seaming technique, but I've come to realize that I like my pockets, especially inseam pockets. Inseam pockets are pockets that are sewn along the side seams of the garment and are almost completely invisible. I've added this type of pocket to a princess seamed dress, two skirts, and four pairs of pants.
Since I've used this type of pocket so many times I thought it would be a good choice for my second sewing tutorial. Hope you enjoy!
I wanted to point out that a lot of the methods and techniques I use in sewing I've learned on my own, so I may or may not do it the "traditional" way. Whatever the case may be, I know from years of practice, that these methods of mine do work!
Supplies: Inseam pocket sewing pattern*, scissors, pins, chalk, ruler or
seam gauge, fashion fabric, (the fabric that will be used for your garment), and lightweight fabric that
coordinates with fashion fabric.
Right now I am working on some lounge pants for my younger sister and I am using a knit velour fabric.
And I am using a lightweight, navy blue cotton for the pocket lining:
I used an inseam pocket pattern that came with a skirt pattern of mine. It looks like this:

There are other types of in-seam pocket patterns out there, but I will only be describing the one that is sewn directly with the side seam of the garment.
*If you can't find any in your pattern stash, you can print out the one I made below following the instructions provided:
1. Click "Download" and save the PDF file to your computer.
2. Open the file using Adobe Reader and print the document. The pattern piece should fit fine on normal, 8-1/2" x 11" paper. If the right and left sides of the pattern are cut off slightly, don't fret, this is probably caused by printer margins. Draw in the lines yourself with a pencil.
3. Measure the line below the text to see if it measures 3-3/4". If it doesn't, adjust the "% of actual size" feature located in the "Effects" tab of "Printer Setup." Print another copy until you achieve the correct measurement.
4. Cut out pattern piece. Do note that 5/8" seam allowances have been added to this sewing pattern.
OK, back to the real tutorial!
Step 1 -- Cut the Fabric: Before you sew the side seams of your garment, cut out 2 of fashion fabric and 2 of a lightweight lining fabric using your inseam pocket pattern. Do keep in mind that each pair needs a mirror image of itself:
If you don't, one pocket will have its wrong side showing when sewn in. Not what you want!
Step 2 -- Mark Pocket Position: I am sewing these pockets to the side seams of a pair of pants so I need to make a line 2" below the top edge of the pants, to allow me to position the pockets so they will be clear of the elastic waistband I will be inserting.
You may not need to do this with your project. If you are making pants or a skirt that has a separate waistband, there is no need to make this mark. Just position the top of the pocket along the top edge of the skirt/pants. It is really up to you where you want the pocket located!
Step 3 -- Layering the Pockets on the Garment: Here is a shot of two of the four pants pieces I am using.
Layer the lining pocket on top of the pants FRONT and the fashion pocket on top of the pants BACK as shown below. Notice that the top edge of my pocket pieces are 2" below the top edge of the pants. Pin pockets in place.
Step 4 -- Stitch Pockets to Pants: Stitch pockets to pants using a narrow 3/8" seam.
Step 5 -- Iron Pocket: Press seam allowances towards pocket.
Step 6 -- Layering FRONT and BACK: With right sides together, layer FRONT pant piece on top of BACK pant piece. Each pocket must consist of one lining and one fashion fabric pocket.
Step 7 -- Pin Pocket: Pin pockets in place.
Step 8 -- Make Stitch Guides: Using your marking tool (a chalk wheel in my case), make a small line 5/8" from seam allowance edges at top of pocket.
Now place a pin 5/8" from pocket's top edge.
Chalk a new line to form a cross, having the pin at the very center.
Do the same thing at the bottom of the pocket:
Make another chalk cross 2" down from first and 5/8" from seam allowance edges.
Do the same at the bottom of the pocket:
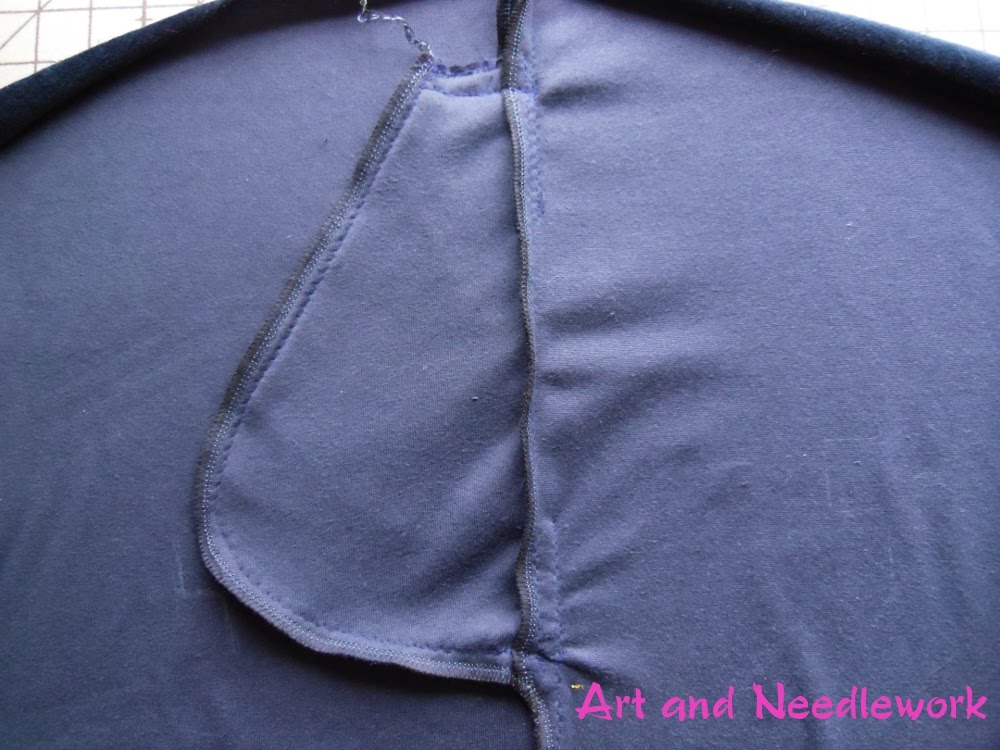
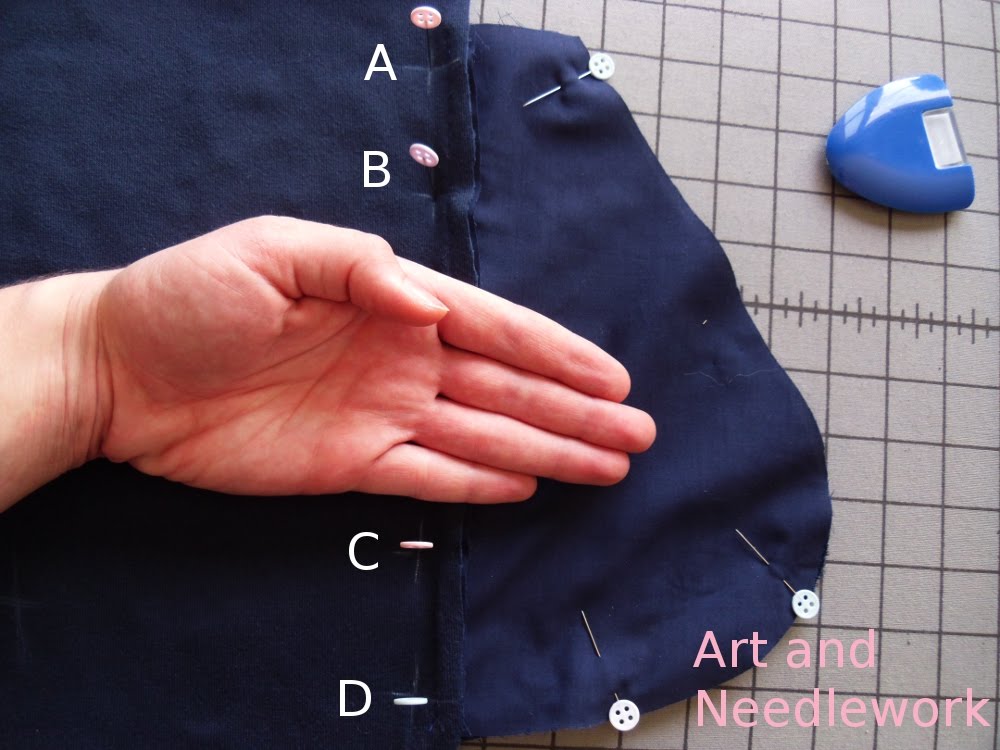
Now you have stitch guides to help you later when sewing the FRONT to the BACK. Regard markings as Markings A, B, C and D, from top going downward. Look at photo below to better visualize markings and the pocket opening:
Step 9 -- Stitching the Side Seams and Pockets: Now it is time to stitch the FRONT to the BACK along with the pocket. Use the next photo below when reading the stitching instructions.
1. Starting at lower edge of garment, stitch along seam line, pivoting stitching at Marking D. Continue stitching along the seam line of pocket until you reach the top. Represented by red line in photo.
2. Starting at top edge of garment, stitch along seam line and pivot stitching at Marking A. Stitch top of pocket. Represented by black line.
3. Stitch from A to B. Represented by white line.
4. Stitch from C to D. Represented by blue line.
Step 10 -- Clip Seam Allowance: If you want to open up your seam below the pocket, clip the BACK seam allowance right below the pocket. Be careful not to clip through stitching. Press seam open below clip.
I didn't want to open my seam because I am using a medium weight knit and I wanted to serge the allowances together to reduce bulk.
--------------
That's it! You have successfully inserted your inseam pocket. Here's what mine looks like:
The FRONT
The BACK
And here it is from the public side:
You can barely see it:
And if someone does get a peek of the interior of the pocket, all they
will see is more of the fashion fabric:
And it isn't a bulky pocket, either. Using a lightweight lining fabric really
helps reduce unnecessary fabric:
------------------
So what did you think of my tutorial? What would you have done differently? Do you have any advice that could help make it better? Have any suggestions for future tutorials? (Could be sewing, knitting, crocheting, quilting, and machine knitting related.) Comment or email me; thanks a bunch!
Tutorials and photos all rights reserved to the writer, Rebekah Fox. If you are interested in propagating this tutorial, please contact me to ask my permission.
Labels: pockets, sewing, tutorials


